Adjust Meta Quest headset fit and feel
Properly adjusting the fit and feel of your Meta Quest headset is essential for an immersive and comfortable experience. This article will guide you through the steps to adjust the straps, lens spacing, and headset angle to achieve the perfect fit.
With a split back strap, lens adjustment wheel and eye-relief buttons, achieving a comfortable fit with your VR headset has never been easier.
To ensure a proper fit when using your Quest 3:
- Start by loosening the back and top straps, then place the headset in a comfortable position against your face.
- Make sure to move any hair that might get in front of your face or between the pad for best comfort and performance.
- Pull the straps over the back of your head and tighten the split straps, then adjust the top strap to take weight off your face and hold the headset comfortably in place.
- If you have a ponytail, we recommend pulling your ponytail through the opening in the split straps to increase comfort.
- You can adjust the angle of the headset to improve comfort by holding the headset with both hands and tilting it up or down on the headset arms.
- Use the lens adjustment wheel on the bottom left side of the headset to change how close together the lenses are. Do this until the visuals in the headset are clear and visually comfortable to see.
- With the headset off, you can also use the depth adjustment buttons to adjust how far the lenses are from your face or eyeglasses.
- Gently tilt the headset arms upward.
- Locate the eye-relief buttons on next to the lenses inside the facial interface.
- Hold down the button on one side while holding the edge of the interface and slide the interface forward or backward to adjust the distance.
- Repeat for the other side to ensure the depth adjustment setting is the same on both sides.
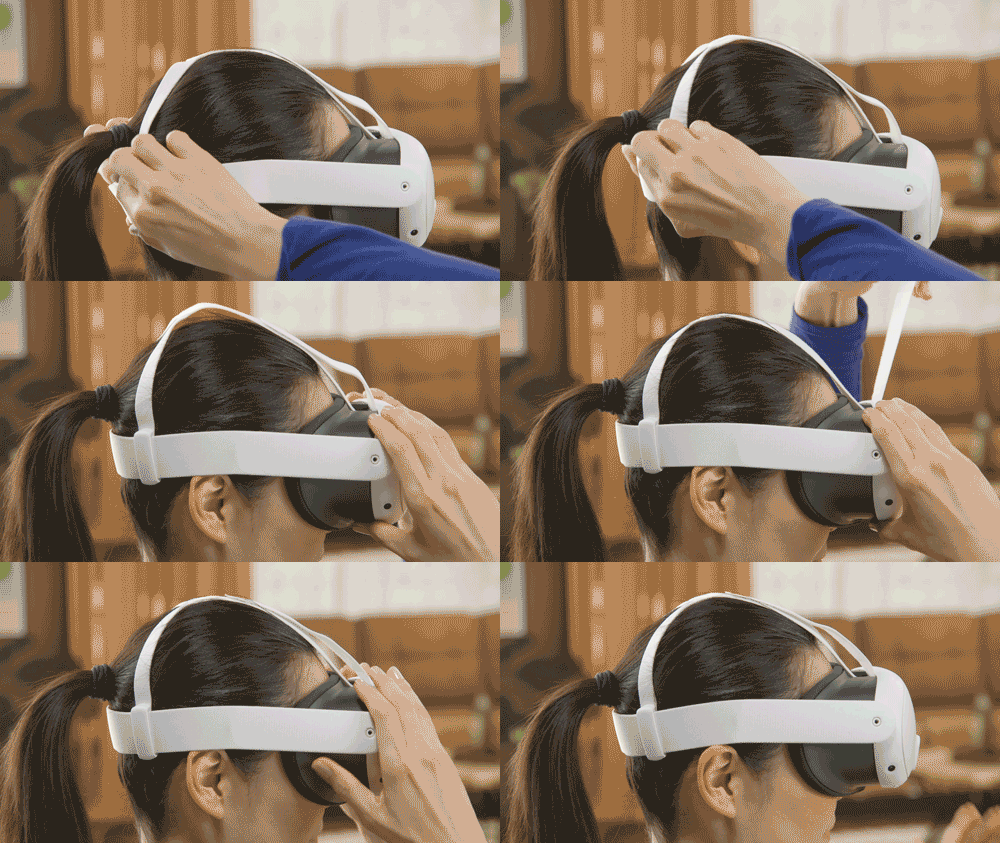
If you’re looking to improve the fit and comfort of your headset, the Meta Quest 3 Elite Strap, Meta Quest 3 Elite Strap with Battery and Meta Quest 3 Silicone Facial Interface are available in the Meta Store and at select retailers.
Meta Quest 3S has a split back strap and lens adjustment to help you achieve a comfortable fit and get the in-headset image clear and in-focus. Follow the instructions below for how to properly wear and adjust headset fit for yourself or someone else.
How to put a headset on yourself
Fitting the headset is best done when you are seated, with the head strap loosened to begin.
- Move any hair away from your face and forehead.
- Put on the headset.
- Hold the headset with one hand and the back of the head strap with the other.
- Bring the headset up towards your face and eyes and pull the head strap over the top and back of your head.
- Ensure that the head strap is sitting just above your ears and behind your head.
- If you have a ponytail, we recommend pulling your ponytail through the opening in the split straps to increase comfort.
- The headstrap should still be loose at this time.
- Adjust side strap for tightness.
- Look up slightly to allow the headset to rest on the face as you reach back and use both hands to adjust the side strap.
- Pull the sliders apart for a tighter fit, or push them together to loosen and reduce facial pressure.
- Adjust top strap for support.
- Adjust the top strap so it is sitting directly on your head to support the weight of the headset.
- Pull up slowly to tighten or pull down to loosen to take weight off your face and hold the headset comfortably in place, then secure.
- You can also adjust the angle of the headset by tilting it up or down from the pivots on the head strap arms to relieve facial pressure.
- With the headset off, adjust the lens spacing width to get the clearest picture inside the headset.
- There are three different lens spacing settings.
- Gently grab the outer part of one of the lenses, and shift the lens left or right until the lenses click into the position that makes the picture clearest for you.
- You can also adjust the top strap so that the headset is slightly higher or lower on your face, or adjust the angle of the headset on your face, which can help make the image more clear.
- Check headset fit.
- To check the fit of the headset, move your head around, up and down, and side to side.
- Pay attention to the movement or bounce of the headset, and ensure there is not much weight from the headset resting on your face.
- The headset should feel snug and comfortable on your face even as you move.
- The image in your headset should be clear and in-focus.
- Make adjustments to the top strap, side strap and lens spacing as needed.
How to put a headset on someone else
Fitting the headset on another person is best done with the person sitting, while you are standing behind or beside them, with the head strap loosened to begin.
- Have the person move any hair away from their face and forehead.
- Help the person to put on the headset.
- Have them hold the headset with one hand and back of the head strap with the other.
- Bring the headset up towards their face and eyes while they’re looking straight ahead and pull the head strap over the top and back of their head.
- Ensure the head strap is sitting just above their ears and behind their head.
- If the person has a ponytail, we recommend pulling their ponytail through the opening in the split straps to increase comfort.
- The headstrap should still be loose at this time.
- Adjust side strap for tightness.
- Have the person hold the front of the headset with both hands while you adjust the head strap.
- Pull the sliders apart for a tighter fit or push them together to loosen the strap and reduce facial pressure.
- Adjust top strap for support.
- Adjust the top strap so it is sitting directly on the person’s head to support the weight of the headset.
- Pull up slowly to tighten or pull down to loosen to take weight off their face and hold the headset comfortably in place, then secure.
- You can also adjust the angle of the headset by tilting it up or down from the pivots on the head strap arms to relieve facial pressure.
- With the headset off, adjust the lens spacing width to help the person get the clearest picture inside the headset.
- There are three different lens spacing settings.
- Have them gently grab the outer part of one of the lenses, and shift the lens left or right until the lenses click into the position that makes the picture clearest for them.
- You can also adjust the top strap so that the headset is slightly higher or lower on their face, or adjust the angle of the headset on their face, which can help make the image more clear.
- Check headset fit.
- To check the fit of the headset, have the person move their head around, up and down, and side to side.
- Pay attention to the movement or bounce of the headset, and ask about the weight of the headset resting on their face.
- The headset should feel snug and comfortable on their face even as they move.
- The image in the headset should be clear and in-focus.
- Make adjustments to the top strap, side strap and lens spacing as needed.
Adjust your Meta Quest 2 headset
- To start, you'll want to gently adjust the lenses by shifting them left, then right until they click into the position that allows you to see what's on the screen most clearly.
- Next, adjust the side straps. To do this, move the two sliders on either side of the top strap.
- To loosen the side straps, move the sliders toward the top strap. To tighten the side straps, move the sliders away from the top strap.
- After you move the sliders, center the top strap between the sliders so that the two sides are equal, and the top strap is centered on your head when you put the headset on.
- Keep in mind, you'll need to remove the headset from your head to adjust the side straps with the sliders.
- If you're wearing glasses, make sure to insert the glasses spacer. When you're ready to put the headset on, put it on from front to back.
- Place the headset on your head, then remove it and make any additional adjustments to the side straps as needed.
- Once you've got the side straps set, put your headset back on and adjust the top strap. You can adjust the top strap by pulling apart the velcro and reattaching it so that your Meta Quest 2 rests lightly on your face and the picture is clear.
- You can fine tune your headset fit and clarity by gently tilting the firm arms on either side of your Meta Quest 2 up and down to adjust the angle of the headset against your face.
Clean your Meta Quest 2 headstrap
Due to its light coloring, some hair dyes may come off on and change the color of the headstrap on your Meta Quest 2. If this happens, you can wash your headstrap:
- Remove your headstrap from your Meta Quest 2:
- Pull apart the velcro on the strap at the front of your headset.
- Gently remove one of the firm arms from the side of your headset.
- Slide the top strap off the detached firm arm.
- Clean your headstrap using cold water and soap.
- Allow your headstrap to air dry, do not try to put it in a dryer.
- Reattach your headstrap to your Meta Quest 2:
- Slide the back loop of the headstrap over one of the detached firm arms.
- Move the headstrap back to its original position so that its centered between the side straps.
- Slide the velcro part of the strap through the plastic loop at the top of the headset.
- Follow the fit steps listed above to adjust your headset until it's resting lightly on your face and the picture is clear.
Getting the right headset angle and strap adjustment for your head can help reduce pressure on your forehead and create a more comfortable experience. The steps below will guide you through the different adjustments you can make with the Meta Quest Pro.
Improve the rear fit wheel and headset angle
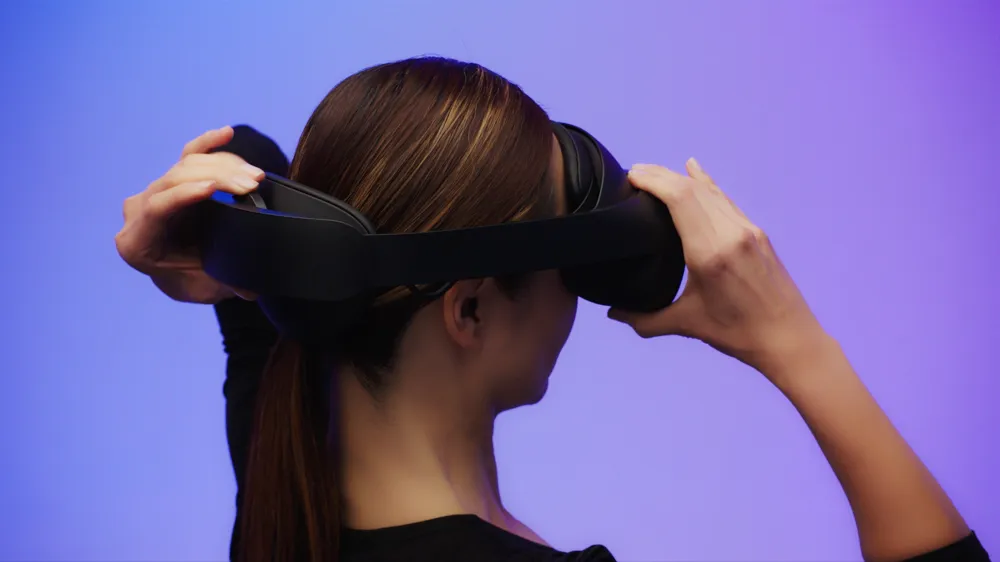
The rear fit wheel changes the tension of the headset strap across your head. To adjust your initial headset fit:
- Loosen the headset strap and put on your Meta Quest Pro. While holding the headset pad on your forehead, adjust the angle of the rear pad and the rear fit wheel until the Quest Pro is supported evenly on your head. Changing the rear pad angle can impact how the pressure is distributed on your forehead.
- Position the headset so that your eyes are centered with the display. The strap should tilt down slightly, with the front of the headset sitting lower than the rear pad. This will vary with every person and their head shape.
When the headset is put on properly, you may notice a slight gap between the bottom of the headset and your cheek as well as open peripherals. This is normal and expected when the headset is being worn correctly.
Adjust the depth wheel
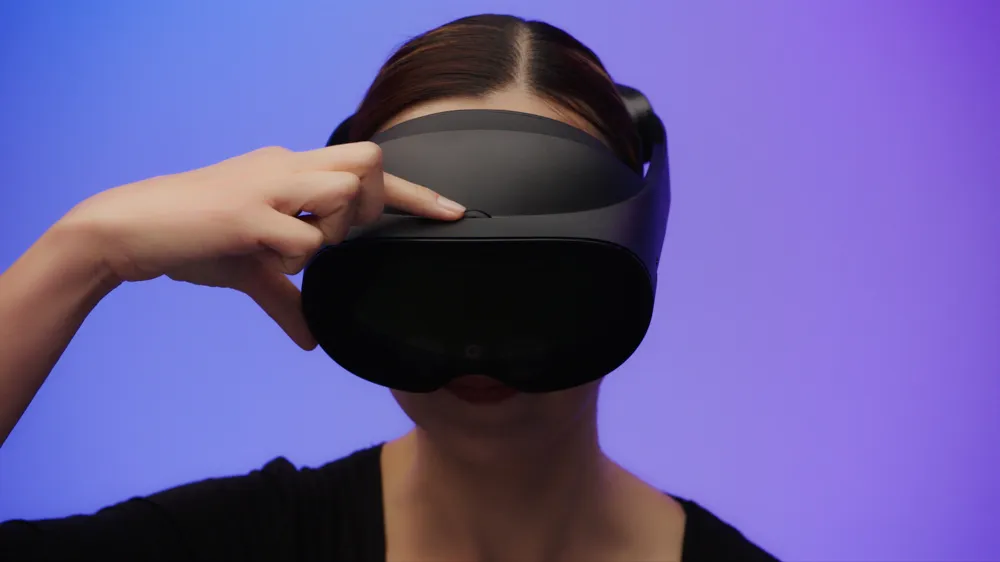
The depth wheel changes the distance of the lenses from your eyes. You may find it easier to adjust the depth wheel while at the same time lifting the headset slightly. This puts less pressure on the depth wheel, making it easier to adjust.
When adjusting how far the lenses of your headset should be from your eyes, the primary factor is personal preference. If you wear glasses, you may want a greater distance between your face and your headset lenses. If your eyes feel strained while using the headset, try putting your lenses closer or further apart.
It can be more challenging to adjust the depth wheel if you're wearing your headset tight around your head. If you’re having trouble adjusting the depth wheel, try loosening your headset then try again.
Lens spacing
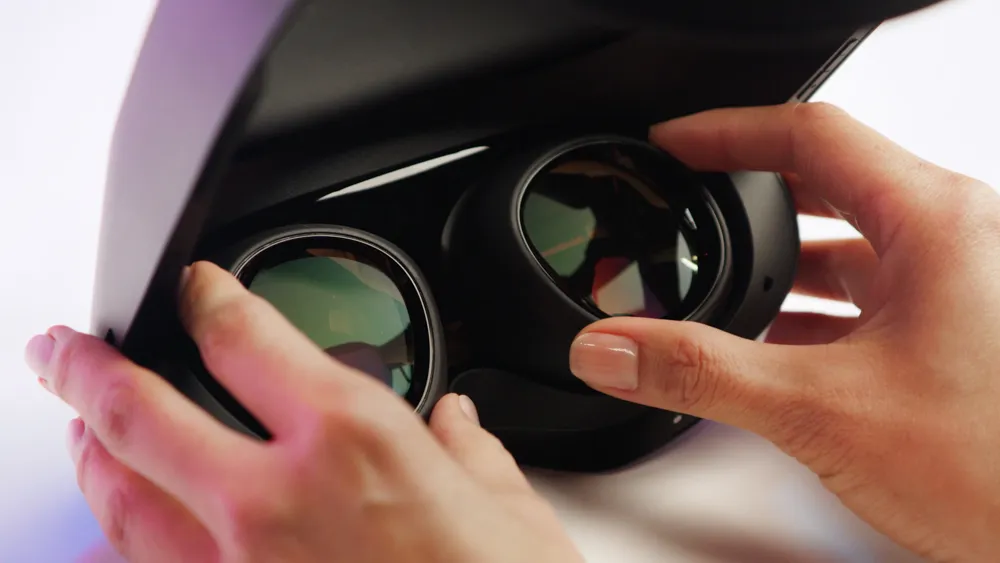
The lens spacing, also known as IPD, changes the lens spacing to improve image clarity. To adjust lens spacing, use your fingers to gently push the lens further apart or closer together. Continue adjusting until everything on your screen is clear and comfortable to read.
Note: Because of the difference in lens technology, Meta Quest Pro has a greater range of comfortable IPDs for most people than previous headsets.
Open periphery and optional light blockers
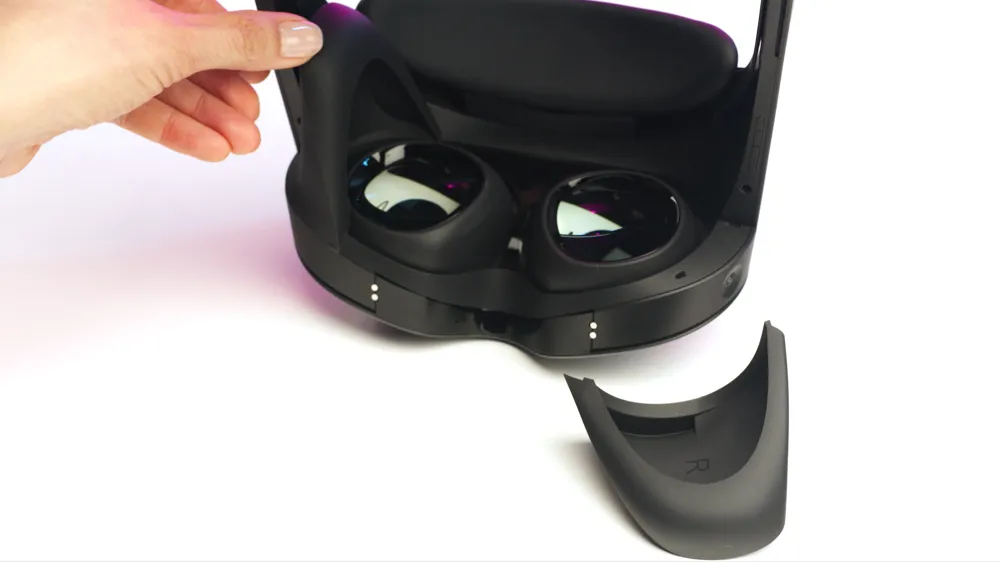
The Meta Quest Pro is designed to have open periphery when there are no light blockers attached. This means that you’ll see external light from your environment in the lower corner of your eye. To block some of the external light, you can use the included partial light blockers. To install, line up the left and right partial light blockers with the headset until the magnets connect.
Taking your headset off
When you’re taking off your Meta Quest Pro, remove the headset by holding the front of your headset with both hands, pull it away and up from your face. If you’re wearing glasses, you may want to loosen the strap and pull the rear pad off first.
Optimize eye and face tracking
If you enable Eye Tracking, your Meta Quest Pro can help ensure that you get the optimal fit and feel for your headset. To turn eye tracking on or off:
- Put on your headset.
- Press
Oculus button on your right Touch controller to pull up your universal menu.
- Select
App library.
- Select Settings, then select Privacy.
- Select Device Permissions.
- Use the toggle to turn Eye Tracking on.
- Select Calibrate Eye Tracking. You can repeat this process at any time.
If you weren't asked to calibrate a particular part of your headset fit, this is because that part of the fit process was evaluated and determined to be fit correctly.